Many, many thanks go out to Bryan Vyhmeister and alpenwasser for their original writeups on this topic.
Disclaimer: Not my fault if you screw this up.
At this point, I think you’re in the minority if you don’t have the ability to boot an EFI shell, so this is a concise version of what I did to flash the LSI SAS 9211-8i HBA to Initiator Target (IT) mode for use with FreeNAS.
Ingredients
- LSI SAS 9211-8i 6Gb/s SAS Host Bus Adapter
- 1 USB Flash Drive (any size)
- Rufus or some other way to format the USB drive
- Latest 9211-8i firmware and Installer for UEFI from LSI
- 9211-8i_Package_P19_IR_IT_Firmware_BIOS_for_MSDOS_Windows
- Installer_P19_for_UEFI
Directions
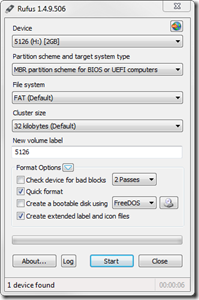
Format the USB Flash Drive. Use Rufus or the built-in Windows formatting tool if you want, but use MBR and FAT, and there’s no need to make a bootable disk since we’ll be using EFI.
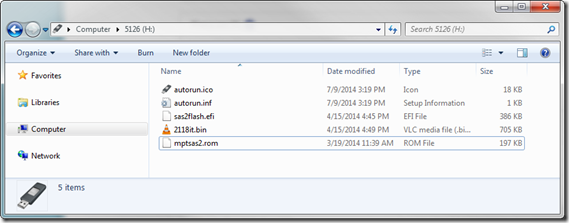
Open the two zip files you downloaded and find the following three files and copy them to your USB drive:
- sas2flash.efi
- 2118it.bin (from the Firmware\HBA_9211_8i_IT folder)
- mptsas2.rom
Disconnect all the other drives and remove any extra controllers from your computer, leaving just the LSI card and plug in your USB drive.
Figure out how to boot an EFI shell and do it.
If it lists your drives, that’s great, otherwise type map to display what drives are detected, then type mount <yourdrive> to mount the drive. ie, I typed mount fs0.
type fs0: to switch to your mounted drive and ls or dir to verify that all your necessary files are there.
Now we flash!
sas2flash.efi -listall to show the controller and verify the current version.
sas2flash.efi -o -e 6 to erase the BIOS, do not reboot after this command.
sas2flash.efi -o -f 2118it.bin -b mptsas2.rom to write the new firmware and BIOS.
And finally, sas2flash.efi –listall once more to verify the updated card. Reboot and press Ctrl-C to get into the LSI BIOS and make sure you’re actually in Initiator Target (IT) mode.


10 replies on “Flashing IT Firmware to the LSI SAS 9211-8i HBA, 2014 EFI Recipe”
I did this but I get an error that there was no address assigned to the SAS card! it still works but the error is bothering me.
how can I fix this?
Best to read the Real ID from your Controller and write it down.
Then again in the UEFI-Environment do the following.
sas2flsh -o -sasadd 500xxxxxxxxxxxxx
Replace the “x..” with your actual Address.
Usually something like 500605B-0-XXXX-XXXX
I found this didnt work for me, instead I used;
sas2flash.efi -o -sasadd 500605XXXXXXXXXX
I found that I could not load the BIOS. Eventually, I was able to load the firmware, use sas2flash.efi -o -sasadd xxxxxx; then I was able to use sas2flash.efi -o -b mptsas2.rom
This guide worked perfectly for me. I prepared a flash drive with the P20 versions of the listed firmwares and a Shellx64.efi, and everything went step-by-step according to plan. Thanks very much for the clear and concise guide.
Hi Matt,
You followed the walkthrough and you didn’t need the sasadd address?
I will be flashing the m1015 ( LSI SAS9220-8) this weekend and I read many different walkthroughs.
On servethehome. They do it like this:
megarec -writesbr 0 sbrempty.bin
megarec -cleanflash 0
sas2flsh -o -f 2118it.bin -b mptsas2.rom (sas2flsh -o -f 2118it.bin if OptionROM is not needed)
sas2flsh -o -sasadd 500605bxxxxxxxxx (x= numbers for SAS address)
That is different from the guide on this page.
Can you tell me the whole step by step guide that you used?
I am a total newbie with this.
Thanks in advance!
My references were the two articles linked at the top of the post. I’ve only used the LSI SAS 9211-8i so I can’t speak reliably about any other controller, unfortunately. But I would guess that if it’s the only SAS controller in your system, that you may not need to specify the address. Good luck.
So this is MY steps, as I dont want a bios (using for freenas) i didnt add one;
sas2flash.efi -listall
sas2flash.efi -o -e 6
sas2flash.efi -o -f 2118it.bin (OR with bios) sas2flash.efi -o -f 2118it.bin -b mptsas2.rom
sas2flash.efi -o -sasadd 500605XXXXXXXXXX
as2flash.efi –listall
EDIT last line ^^^^^^^^^^
sas2flash.efi –listall
[…] Follow the rest of the instructions on this page (http://digitalcardboard.com/blog/2014/07/09/flashing-it-firmware-to-the-lsi-sas-9211-8i-hba-2014-efi…😉 […]