I’ve got a number of Brother HL-2270DW laser printers around the office, and they’re wonderful. I even have one at home. Wireless-capable with built in duplexing, and on sale the unit is under $100. What’s not to like?
Toner is fairly inexpensive too, but I like to squeeze as much of the life out of them as I can. By default, the toner life is strictly regulated by the page counter, and once the limit is reached, the printer stops until you replace the toner.
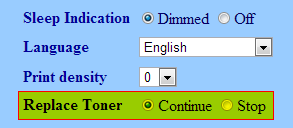
Enter the all important Toner Continue Mode. If the printer is networked, you can simply bring up the control panel by browsing to your printer’s IP in your browser. Click on Printer Settings (log in with username ‘admin’ and password ‘access’ if you haven’t changed the defaults) then make sure you set Replace Toner to Continue. Hit Submit at the bottom to save, and you’re set! You’ll be able to take the cartridge and shake it until you can’t shake it any more, just like the good ol’ days.
Important Note (12/20/2012): I just caught my error and updated the screenshot and post, but there’s a difference between the Continue Mode on the settings screen and the Replace Toner option. I think the Continue Mode will toggle the printer for recovering from a printer error, for example, after you unjam the printer. Replace Toner is the option you want to set, and isn’t available on all Brother printers. It’s super confusing because they call them the same thing…
I’ve found that after changing toner cartridges, this mode will often be reset, so you’ll need to remember to change it back when swapping cartridges.
The other method to set this is useful if your printer is in USB mode, directly connected to a computer. I just found out about this today. To quote Brother’s FAQ:
To enable Continue Mode, please follow the steps below:
Press the GO button 7 times (quickly). All of the LEDs should flash twice, and the Ready LED should turn on. Continue mode is now enabled.
To disable Continue Mode, please follow the steps below:
Press the GO button 7 times (quickly). All of the LEDs should flash once. Continue mode is now disabled.
I would assume this would also work for a networked printer, but it’s nice to know that this can also be set for a standalone one. There’s no setting in the driver to adjust this option, so here’s how to do it.
