Categories
Software System Administration

Static Devices on Remote Side of a SonicWALL Site-to-Site VPN? Remember to Renegotiate!

tl;dr If you are having trouble with devices that have static IPs on the remote side of your Sonicwall Site-to-Site VPN, go to VPN and click Renegotiate under the Currently Active VPN Tunnels.

We’ve got another warehouse with a site-to-site VPN setup using SonicWALL devices. It works decently enough for what we need.

While most of the workstations at the remote site get an IP from the DHCP server at the central site, some of the devices at the other warehouse have static IPs (printers, wireless APs, etc).

Defining these static IPs in the SonicWALL is pretty easy. On the remote gateway side, go to VPN –> DHCP over VPN –> Configure –> Devices Tab and enter the IP and MAC address of your static devices under Static Devices on LAN.

However, occasionally when adding another static IP, or when updating the firmware, or when it just feels like it, the routers will have trouble passing traffic from the central side to the remote side for just the static IPs. I’m using Nagios to report on the status of most of these devices, so it starts complaining fairly quickly that it can’t access them. Usually the remote side can still see those static devices, but for printers that connect back over the VPN to a printer server, this becomes a problem.

I used to think that just deleting all the static devices listed and re-adding them would work, but I had major problems with this today.

The workaround that seems to work for me now is simply going to the VPN settings page and clicking Renegotiate under the Currently Active VPN Tunnels section.

I don’t see anything like this written up on any of the SonicWALL support pages, so if anyone else runs into this weird situation, it’s worth a shot.

Categories
Computer Fixin' Lifehacks Software System Administration

Extend Toner Life on Your Brother HL-2270DW By Enabling Toner Continue Mode

I’ve got a number of Brother HL-2270DW laser printers around the office, and they’re wonderful. I even have one at home. Wireless-capable with built in duplexing, and on sale the unit is under $100. What’s not to like?

Toner is fairly inexpensive too, but I like to squeeze as much of the life out of them as I can. By default, the toner life is strictly regulated by the page counter, and once the limit is reached, the printer stops until you replace the toner.

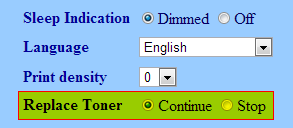
Enter the all important Toner Continue Mode. If the printer is networked, you can simply bring up the control panel by browsing to your printer’s IP in your browser. Click on Printer Settings (log in with username ‘admin’ and password ‘access’ if you haven’t changed the defaults) then make sure you set Replace Toner to Continue. Hit Submit at the bottom to save, and you’re set! You’ll be able to take the cartridge and shake it until you can’t shake it any more, just like the good ol’ days.

Brother HL-2270DW - Replace Toner

Important Note (12/20/2012): I just caught my error and updated the screenshot and post, but there’s a difference between the Continue Mode on the settings screen and the Replace Toner option. I think the Continue Mode will toggle the printer for recovering from a printer error, for example, after you unjam the printer. Replace Toner is the option you want to set, and isn’t available on all Brother printers. It’s super confusing because they call them the same thing…

I’ve found that after changing toner cartridges, this mode will often be reset, so you’ll need to remember to change it back when swapping cartridges.

The other method to set this is useful if your printer is in USB mode, directly connected to a computer. I just found out about this today. To quote Brother’s FAQ:

To enable Continue Mode, please follow the steps below:

Press the GO button 7 times (quickly). All of the LEDs should flash twice, and the Ready LED should turn on. Continue mode is now enabled.

To disable Continue Mode, please follow the steps below:

Press the GO button 7 times (quickly). All of the LEDs should flash once. Continue mode is now disabled.

I would assume this would also work for a networked printer, but it’s nice to know that this can also be set for a standalone one. There’s no setting in the driver to adjust this option, so here’s how to do it.

For more information:

Categories
Software System Administration

The Journey From MyFax to MetroFax

(edited 2012/09/20 to add some important caveats)

I’ve already established that MyFax is slowly going down the tubes. The following chronicles my experience switching to a new service.

After some research, I settled on MetroFax as my new internet faxing provider. They’re based just a few hours away from me in the beautiful Pacific Northwest, and don’t appear to be attached to any large corporate conglomerate of faxing companies. They’re a little cheaper too, which I can’t complain about.

Now, here’s the important thing to note: MetroFax doesn’t allow porting from MyFax numbers, because I believe they’ve historically had problems with MyFax releasing numbers. Go figure. They must’ve been burned pretty hard to not even bother trying anymore.

So how do you get to MetroFax without losing your number? The answer is NumberGarage.

An Important Caveat

As mentioned in the comments, you can only port a number out of MyFax that you originally ported in. Section 19 of the MyFax terms goes into the particulars on this, but essentially when signing up for their service they do not provide you with permanent access to the phone number if they assign it to you, and retain the right to take that number back and charge you money if you try to port it away.

MetroFax has a similar stipulation (see Limited License To Use; Limitation of Transfer Rights), so as much as I’ve been pleased with their service, this is something to keep in mind.

FaxLogic will actually allow you to port a number out that they’ve assigned to you, so if you don’t already have a faxing service and are thinking about starting out, this is a good option to consider.

(So no warranties here. Consider this an educational example of a possible process. I’m not liable if your experience is different that what’s documented here.)

Porting from MyFax to NumberGarage

Signup is painfully simple. Your account number is your fax number, after which you provide some contact information and carrier transfer info. There’s a $29.95 charge for the initial port, but for me that was better than losing the number or staying with MyFax.

You’ll also setup whether you want to park or forward your number. If you want interrupted faxing service, start up a trial account with MetroFax, and then set up forwarding in NumberGarage to forward to the number they assign you during the trial.

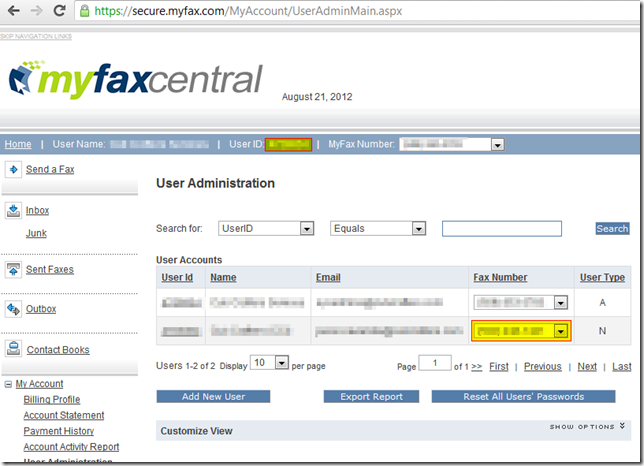
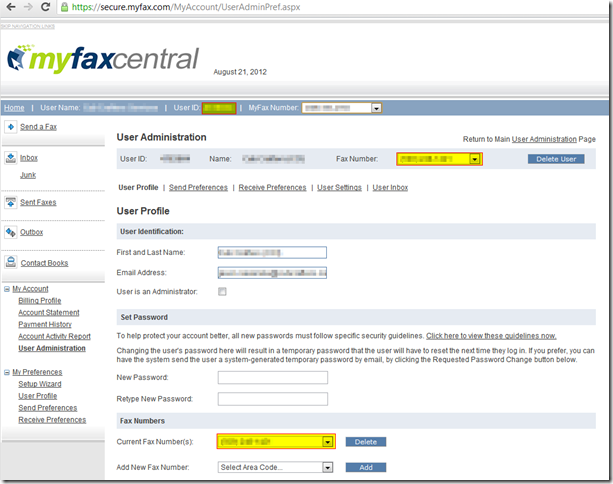
Providing a bill is the last step, and it’s a little tricky, as MyFax doesn’t provide you with a bill that shows your phone number. I ended up printing the bill, then taking a few screenshots highlighting my account number and phone number for verification, then zipping it all together and sending it as proof.

MyFaxCentral-User Administration Main Page - Google Chrome_2012-08-21_13-49-51-obfuscatedMyFaxCentral-User Profile Administration - Google Chrome_2012-08-21_13-50-37-obfuscated

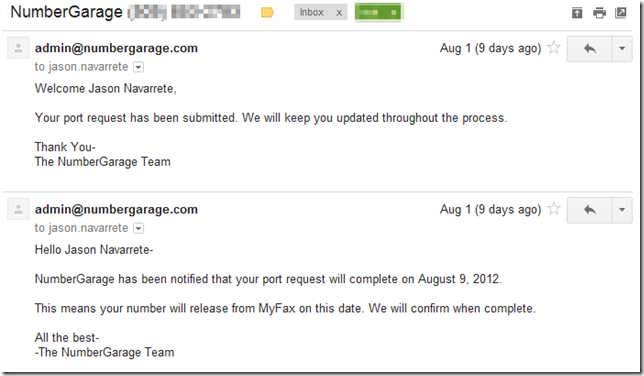
You’ll receive an email after they confirm the port request, followed by a estimated porting date.

NumberGarage_before

Then you wait. And a few days later, success!

NumberGarage_after

Porting from NumberGarage to MetroFax

The process here is about as easy as the first port. Make sure you’ve converted from the trial to a full plan, then contact MetroFax’s porting department, and they’ll send you over a Letter of Agency/Authorization (LOA) document to fill out. NumberGarage gives you a PDF bill the instant you sign up for their service, so attach that to the email with the signed LOA, and that’s all you need! Note that there’s another porting fee here, but it’s the price of doing business, I guess.

MetroFax will confirm with you that you want to replace your temporary number with the ported one, and then you wait.

A few short days later, you’ll be greeted with a welcome email with your ported number, and you’re done!

Cleanup and Final Thoughts

Be sure to cancel your MyFax and NumberGarage services at this point, or they will both probably gladly keep charging your card for services you no longer need. You could probably cancel MyFax immediately after porting out to NumberGarage, but I figure waiting until the whole process is completed is a little safer.

Prior to finding out about NumberGarage, I did another port from MyFax to MetroFax through a VOIP provider, and while it worked just fine, the process was much more convoluted than using NumberGarage. I also considered having our phone provider handle the port. NumberGarage just worked, and was easy to use.

Let met know in the comments if you find another service that works for you, or if MetroFax is ever able to start porting directly from MyFax.

Good luck porting!

Categories
Software System Administration

Gmvault: gmail backup (Ubuntu install and setup)

(edit 8/20/2012: Originally written for v1.5, this has been tested and works fine as of Gmvault v1.7-beta, so just change things accordingly and install away! I’ve updated the links below.)

I’ve been using getmail for over a year to backup my Gmail account. As far as I know, it’s been working, but it just grabs email over POP, dumps them into an mbox file, and that’s that. It’s a fairly basic procedure, but since it just blindly downloads emails, getmail doesn’t account for ones I’ve deleted, and I don’t know if it keeps any label information.

So along comes Gmvault, the new kid on the block with fancy restore features and multiple OS capability. Let’s give it a shot.

Python should be installed on a default Ubuntu machine, but let’s install a few other pre-requisites as well. I’m using Ubuntu 12.04 LTS (Precise Pangolin).

sudo apt-get install python python-setuptools
sudo easy_install -U distribute

Then download the source package for Gmvault:

wget https://github.com/downloads/gaubert/gmvault/gmvault-v1.7-beta-src.tar.gz

Unpack it:

tar xvzf gmvault-1.7-beta-src.tar.gz

Then install!

cd gmvault-1.7-beta/
sudo python setup.py install

The basic setup is about as simple as it comes:

gmvault sync your_email@gmail.com

The setup process will take you through an authentication process with your email account.

Since I ran the install on an Ubuntu headless server, it loaded the text-based w3m browser, which I was able to login to my account, but then was unable to approve Gmvault to access my email. Pressing ‘q’ quits the browser and you’ll be presented with with an OAuth link you can copy into a normal browser and authorize Gmvault that way. (Note: you can manage what apps can access your Google Account at any time)

Once Gmvault is given the okay, it’ll start churning away downloading emails. Give it a few minutes (or hours) to finish, and feel better knowing that your hoard of oh-so-important emails are now tucked away in yet another location.

There’s a few other parameters you can pass to the program, which will allow you to change the vault database location, provide a user/pass rather than the OAuth token, and to run custom synchronization of certain emails. Take a look at the in-depth documentation on Gmvault.

After running the initial sync, you can run the following command to run a quick sync (only the last 2 months are scanned):

gmvault sync --type quick your_email@gmail.com

Restoration of emails appears to be straightforward (although I haven’t tried it) and emails are stored in month folders as individual .eml.gz and .meta files. The gzipping appears to be fairly efficient, as the Gmvault database reports to be about 2/3rds the reported size of my Gmail inbox. Not bad at all!

Also–for the sake of completeness, a few days after I wrote this I found out about BaGoMa, which is another Python-based utility to backup your Gmail. Seems to follow a similar path as Gmvault, but I like Gmvault’s ability to use OAuth rather than have to provide my password each time.

So far, Gmvault appears to have a simple and easy to use product that fits my needs. Good work!

Categories
Software System Administration

Upgrading to NConf 1.3.0 on Ubuntu 11.10 Oneiric Ocelot

Congrats to the NConf crew for reaching the 1.3.0 milestone! Two years in the making, but I’m excited to see the project continuing to move forward.

It’s been over a year since I originally installed and configured Nagios and NConf 1.2.6 on my Lucid Lynx server. In the meantime, I’ve upgraded the hardware and moved to Ubuntu 11.10 Oneiric Ocelot, mostly to keep up with the current releases. Not a whole lot has changed for what I use this server for, but keeping up with the Nagios releases in the repos has been convenient.

If you’re following along with this guide but starting fresh with Nagios and Nconf, you’ll probably want to take a look at my previous guide and the NConf installation documentation to get some background information. I’ll try to provide some notes for those of you doing a fresh install, but since I’m just upgrading, I can’t make any promises.

Backups!

Log into your server and make them backups!

sudo cp -rp /var/www/nconf /var/www/nconf.bak
mysqldump -u root -p nconf > ~/nconf_sql.bak

I also backed up my Nagios configs

sudo cp -rp /etc/nagios3 /etc/nagios3.bak

Download and Unpack

Wget or otherwise download the latest version on Nconf. Wget has that issue with following SourceForge links so you may need to rename the file.

Unpack the files and then copy them to where you installed NConf before, or do it all in one step:

sudo tar xzvf nconf-1.3.0-0.tgz -C /var/www

Then fix the permissions for the NConf folder, setting them back to your apache user:

sudo chown -R www-data:www-data /var/www/nconf

Upgrade

Browse to http://<yourserver>/nconf/UPDATE.php

Follow the prompts to proceed with the interactive update. NConf’s documentation on the update process has screenshots that I won’t repost here.

After the upgrade, you’ll need to remove some files and folders. Browse to your NConf folder and nuke them. I also had to remove the call_ajax.php file, which wasn’t in the original documentation.

cd /var/www/nconf
sudo rm -rf INSTALL/ UPDATE/ INSTALL.php UPDATE.php call_ajax.php

There’s been a few changes/additions to the NConf conf file, so open up config/nconf.php and add the following lines:

define('CHECK_UPDATE', 1);
define("DEBUG_GENERATE", 3); # [1=ERROR|2=WARN|3=INFO|4=DEBUG|5=TRACE]
define('CHECK_STATIC_SYNTAX', 1);

Also, set the ALLOW_DEPLOYMENT variable to 1 to enable deploying configs directly from NConf and comment out the other CONF_DEPLOY_ variables, as they aren’t used anymore.

define('ALLOW_DEPLOYMENT', 1);
#define('CONF_DEPLOY_URL', "https://webserver.mydomain.com/incoming_config.php");
#define('CONF_DEPLOY_USER', "deployUser");
#define('CONF_DEPLOY_PWD', "deployPass");

At this point, you should be able to log into NConf 1.3.0 and look around.

Migrating Deployment

With NConf 1.2.6, I used the ADD-ONS/deploy_local.sh script and a cron job to deploy configuration changes to Nagios. In 1.3.0, they’ve integrated this a little better into the core of the application, but it required some adjustment in my setup.

Start off by coping the deployment.ini sample configuration file to the config folder:

sudo cp /var/www/nconf/config.orig/deployment.ini /var/www/nconf/config/deployment.ini

Open up the config/deployment.ini file, uncomment the LOCAL deployment section except for the [copy nagios.cfg] section and change the target_file variables to reference the nagios3 folder where Ubuntu places the config files.

Also, add the reload command (sudo /etc/init.d/nagios3 reload) at the bottom of the [copy global config] section. When you’re done the file will look similar to the following:

;; LOCAL deployment ;;

[extract config]
type = local
source_file = "/var/www/nconf/output/NagiosConfig.tgz"
target_file = "/tmp/"
action = extract

[copy collector config]
type = local
source_file = "/tmp/Default_collector/"
;target_file = "/etc/nagios/Default_collector/"
target_file = "/etc/nagios3/Default_collector/"
action = copy

[copy global config]
type = local
source_file = "/tmp/global/"
;target_file = "/etc/nagios/global/"
target_file = "/etc/nagios3/global/"
action = copy
; *** add the line below
reload_command = "sudo /etc/init.d/nagios3 reload"
; *** keep this section and the rest of the file commented out
;[copy nagios.cfg]
;type = local
;source_file = "/tmp/static_cfg/nagios.cfg"
;target_file = "/etc/nagios/nagios.cfg"
;action = copy
;reload_command = "sudo /etc/rc.d/init.d/nagios reload"

This process replaces the deploy_local.sh script, but we’ll need to allow the web user to issue the Nagios reload. To do that, we need to modify the sudoers file:

sudo visudo

Then add the following lines:

# Allow www-data (apache) user to reload nagios
www-data ALL=NOPASSWD: /etc/init.d/nagios3 reload

Save and quit.

Finally, remove the entry in the root crontab entry that launched the old deploy script:

sudo crontab -e

And remove the line reading:

* * * * * /var/www/nconf/ADD-ONS/deploy_local.sh

Deployment Testing and Cleanup

Let’s make sure the new deployment procedure works. Back in the NConf GUI, click Generate Nagios config. You should hopefully see something like:

[INFO]  Starting generate_config script
[INFO]  Generating global config files
[INFO]  Generating config for Nagios-collector 'Default Nagios'
[INFO]  Ended generate_config script

If the config files generate successfully, you’ll see a button aptly labeled ‘Deploy’.

Click Deploy, and with any luck you’ll be presented with three OK messages in NConf  and your Nagios Event Log should show a SIGHUP message.

Relax, and enjoy some JQuerified NConf 1.3.0 goodness! Gold star!

I did notice that the original deployment method left a bunch of old config tgz bundles, so if you’re feeling like cleaning those up, just remove the whole lot:

sudo rm /var/www/nconf/output/NagiosConfig.tgz.*

Update (6/25/12): You’ll want to remove the extended_host_info.cfg and extended_service_info.cfg files from your target config directory (/etc/nagios3/Default_collector/), or you might get weird problems trying to deploy later on. I just found this out six months later.

Troubleshooting Notes

  • The biggest problems I had were just remembering to reference nagios3 rather than nagios for paths and commands.  Make sure you reference the correct locations. This caused me all sorts of weird grief with the sudoers file, and I didn’t catch it until later.
  • While NConf will run without the additional variables in config/nconf.php, it’ll log warnings until you add them.
  • I had to remove an extra file (call_ajax.php) before NConf would run. The file has been replaced with call_file.php which apparently fixes a security issue. At the time of this writing, removing this file wasn’t in the docs, but it complains until you nuke it.

Fresh Install of Nagios and NConf

From what I can tell, you can follow all the steps in my old guide for installing 1.3.0 up until you get to Configuring NConf to Deploy Nagios Configurations Automatically. At that point, follow the Migrating Deployment instructions from this guide.

Please leave a comment and let me know if you do a fresh install. I’d be curious to know how it works for you.

More Information

 (edit 6/25/12 to add additional file cleanup instructions)


Categories
Software System Administration

vBulletin 4.1.7 Mobile Style Giving You Grief?

I upgraded a forum to vBulletin 4.1.7 last night. Pretty straightforward stuff, only the mobile style that they half-introduced back in 4.1.2 or somewhere along the lines has been a little glitchy.  4.1.6  reintroduced the mobile style, but I blinked and 4.1.7 was released.

I ended up deleting the mobile style and reimporting it from scratch (see Installing the vBulletin Mobile Style from their manual) but the grid menu button didn’t seem to work. The grid menu is where they’ve put notifications, messages, what’s new, etc. in the mobile style. In particular, I had some users ask where the What’s New feature was in the mobile style, and that’s finally been added, so it was important to get the grid menu working.

Here’s what I found.

vBulletin Mobile Style Grid Menu Fix
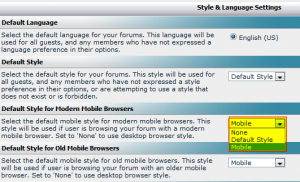
Set the Default Mobile Style for Modern Browsers to your Mobile style

Under Settings -> Options -> Style & Language Settings, make sure to set the Default Mobile Style for Modern Browsers to your Mobile style. I went ahead and set as the default for Old Mobile Browsers as well, since I don’t know what the difference is.

And voila!

That is all.

Categories
Software

MyFax Support, You Suck

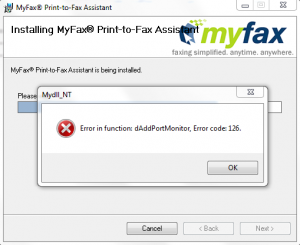
tl;dr MyFax Support sucks. Getting ‘Mydll_NT: Error in function: dAddPortMonitor, Error code: 126.’ installing the Print-to-Fax Assistant? Run msiexec /i myfaxassistantsetup.msi /q and install in silent mode.

Dear j2 Global Communications/Protus/MyFax:

Please remind your company to care about their software and the people that use it. In particular, you need to provide support for the installation of your products. Telling someone you won’t support your own product until it’s installed is ridiculous and asinine.

What Went Wrong: Installing Print-to-Fax Assistant

A few days I attempted to install the MyFax Print-to-Fax Assistant on a fresh-out-of-the-box Dell workstation running Windows 7  Professional 32-bit SP1. Nothing out of the ordinary installed on this system. It’s joined to a domain and I’m running the install as myself, a user with administrative rights on the local machine.

I accept the EULA and all the defaults to get the install on its merry way, and I receive the following error:

MyFax Print-To-Fax Assistant Installation Error
Mydll_NT: Error in function: dAddPortMonitor, Error code: 126.

After that, the install failed and the MSI rolled back.

I tried a reboot and a few other normal troubleshooting tactics, and it all ended with the same error. I’ve got the Print-to-Fax driver installed on a Win 7 64-bit and another Win 7 32-bit install, as well as an XP box, so I know the thing works. Even tried downloading the installer again and comparison the checksum. Everything checked out, but it wouldn’t install. It’s not a particularly helpful error message, and there’s no information on any sort of manual installation process.

To the Googles! Less than 150 results come back on a search for this particular error. Mostly from Black Ice Online Support, which leads me to suspect that they provided the lower level drivers that MyFax uses. Searching for this particular error specific to MyFax returns nothing.

How Not To Help: MyFax Support

MyFax Knowledgebase

Nothing there of any relevance. In fact, it looks like the latest I can find on any subject was last modified almost a year ago in June of 2010. (Update: by the time I got around to finishing this article, I now see one new knowledgebase post from July 2011.)

Online Chat Support

So, it’s time to contact support. First, I try the online chat. Here’s where it gets interesting.

I’m told that:

  • The Print-to-Fax driver is not compatible with Windows 7 (contrary to information on the MyFax site even showing 64-bit Win 7 compatibility)
  • The Print-to-Fax driver is one of the oldest plug-ins they have
  • That Blackberry, iPhone, and Android apps are out or in the making

None of which helps in the slightest to resolve my situation.

It’s also suggested that I turn off my firewall (which it is), and then I’m given a couple of Google hits on the error, neither of which reference MyFax in any way.

Finally, I’m told that it’s not a MyFax error, and it’s the computer that’s giving me this error. Oh really? So the fact that I get this error when installing the MyFax product means nothing? How about uninstalling it and then reinstalling (except I NEVER GOT IT TO INSTALL IN THE FIRST PLACE!!!!!)? Blerg. Kthxbye.

Phone Support

Let’s see if a phone call nets anything more helpful. What follows is a highly paraphrased conversation.

I’m told by the Tier 1 tech that it’s a driver issue, and that I need to install the driver so that the Print-to-Fax assistant will work. And to try Google. Can I speak to a supervisor? Sure, he says, and puts me on hold.

Me: “Hello Mr. Supervisor? I can’t install your program!”

Supervisor: “Well, Mr. Customer, the ‘dAddPortMonitor’ error is a very common error. You need to install the Mydll_NT.dll in order to get our program to work.”

(Common? ‘dAddPortMonitor’ returns less than 300 hits on a search engine. ‘Mydll_NT.dll’ returns about 600)
Me: “I can’t download Mydll_NT.dll, because it came with your software. I can’t install your software.”

Supervisor: “Oh, you can just go to Microsoft.com or Google and search for it and download it.”

Me: “Yeah, no, I can’t.”

Supervisor: “Well we cannot support the Print-to-Fax assistant until it’s installed at which point we can check settings remotely from our systems?”

Me: “So you’re telling me you sell a product that you don’t support? If I can’t get your product installed, I can’t use your product. What about those Blackberry, iPhone, and Android apps? You’re telling me if I can’t get them installed, that’s my own problem?”

Supervisor: “Basically, yes.”

Me: “Okay, we’re getting nowhere. If you have any play at all with anyone in management, customer support, marketing, or product development, tell them that SOMETHING IS MAJORLY WRONG HERE. *click*”

Finally, a Workaround

I really shouldn’t have to do this, and MyFax support has given me nothing to go on, but I keep troubleshooting the issue. Running msiexec.exe with verbose logging options enabled, I discover that the TARGETDIR variable is ignoring the default path and is dumping all the files in the root folder. Changing the path doesn’t help, creating the path ahead of time doesn’t help, nor does copying the extracted files to the path in the middle of the install. Same error.

For kicks, I try a silent install:

msiexec /i myfaxassistantsetup.msi /q

It works. Why? No idea. Do I really care at this point? Not really. I run a test fax through, and it works. Reboot, and it still works.

What’s Still Wrong

So I got the Print-to-Fax Assistant to install. Yay. However, I don’t think I’d be writing all this if the whole support experience wasn’t so terribly, utterly, horribly, bad.

On one hand, MyFax and the whole internet faxing universe is really just an attempt to hold onto an antiquated technology that really should have been replaced by something better years ago, but amazingly, faxing still exists and Osama Bin Laden doesn’t. But that’s beside the point.

Here’s the thing: I pay for your software. Other people pay for your software too.

Granted, it’s not a lot of money every month, but it’s not like I’m mooching off free software. You’ve got a support page with numerous ways to contact you. But to tell me you won’t support me until I get the program installed…that’s just wrong. That’s like Dell telling me they can’t help me troubleshoot a brand new system that won’t boot up until I can get it turned on.

The installation process is a critical part of the distribution of software. If your program can’t be installed, then people can’t use it, and then it’s worthless. Zero stars rating. Refund.

The least you could have done was taken a note of the issue, given me a ticket number, and then ignore me. At least then I would’ve thought (initially) that somebody cared.

What Can Be Done

Start by fixing your Print-to-Fax Assistant installer.

Windows 7 has been out for two years. Make your software compatible. Simple as that. I downloaded the 64-bit version the other day, and got the same error message on my own desktop, and fixed it by running it through a silent install as above. But that’s a poor workaround. I’ve now had this error on at least four separate machines, so it can’t be just a fluke.

Next, figure yourself out as a company.

With all your buyouts, I count at least five distinct faxing services you offer. I’m not going to bother to list them here, and frankly I don’t care about your other products, because I don’t use them. If you want, consolidate all these similar products into one and then focus on making that product better.

Finally, beef up your support.

Support is your first line when customers are having problems. If they can’t resolve simple issues because they’re uninformed of the solutions, then provide training. Make it better.

Maybe you don’t care

j2 Global Communications, it’s entirely possible that MyFax doesn’t matter to you. Somehow your stocks are still are still up and you’ve apparently got money in your pockets with reported growth over a number of years, but the product I care about seems to be dying a slow and painful death. Since buying Protus in December 2010, you cut 100 employees from the Ottowa office and presumably dumped that workload on other locations. On on the MyFax and related websites, I see the following:

  • 1 new knowledgebase article in the last year
  • The last post on the MyFax Blog is from 7 months ago (January 2011) and as far as I can tell, all the actual content contributors on the blog are no longer with Protus or j2
  • A black hole of tweets between Dec 2010 and June 2011
  • Twittermonials on the main page of MyFax.com shows the last favorited tweet to be 200+ days old
  • Last released dates for the iPhone and Blackberry apps are both over a year old, and both with less than 50% ratings. There’s no Android app at all, and no acknowledgement publicly that they’re even working on an app for this platform.
  • The MyFax What’s New page shows a Fall 2010 Update, and nothing newer.

I could be wrong. Maybe you do want to make MyFax better. Maybe you do want to provide customers with a good experience in the bizarre world that merges the zombie-that-will-not-die that is faxing with this internet world that has Google+ and TouchPad fire sales.

People liked MyFax. Unsurprisingly to me, people liked MyFax better than eFax. This should mean something to you when deciding where to devote your time and attention.

If you do care, then show it.

Sincerely,

Jason Navarrete

Categories
Software

Quick and Dirty (Free)DOS Bootable USB Drive Under Linux

I found myself needing to flash a BIOS today, which required a DOS or Windows 98 bootable floppy disk.  Forget that.  Let’s use a USB drive instead!

Googling around returned methods that seemed way too involved for what I was trying to do.  Here’s the three commands I ended up using:

wget http://www.fdos.org/bootdisks/autogen/FDOEM.144.gz
gunzip FDOEM.144.gz
sudo dd if=FDOEM.144 of=/dev/sdb

Be sure to change /dev/sdb to whatever your USB drive shows up as. (Disclaimer: I’m not responsible if you end up nuking your secondary hard drive)

Then unplug the drive and plug it back in.  Unzip your files onto the drive (mine shows up as /media/FREEDOS), eject, and flash away!

You’ll end up with about 1.3 MB of free space on the drive, which should be enough for the majority of things.

Categories
Software

Linux ‘rename’ utility on OS X

(edit 12/11/2012 to add homebrew alternative)

So you you want the powerful Perl-based rename utility that comes with many Linux and *BSD distributions, but sadly not on Apple’s mighty OS X? Well so did I. (Go away you fanboys of all types. I hear not your rants about which operating system is for the win)

Thinking about it for a moment, I realize there’s nothing really stopping me from just taking the script, and thankfully it’s free software and we can pretty much do whatever we need to with it.

The rename utility is tucked away under /usr/bin/ on my Ubuntu machine.  To get it to your OS X machine, it’s just a matter of copying /usr/bin/rename on a Linux box and dropping it in /usr/local/bin/ or somewhere else that’s in your PATH on your OS X box.  If you’re really feeling the need for the man page, you can grab it from /usr/share/man/man1/rename.1.gz.  I stuck the man page in /usr/local/share/man/man1/.

And that’s it! You can now go about using Perl regular expressions to rename multiple files and get lost in everything that is regexp.

Don’t have access to a Linux machine, you say? Oh fine. Here’s what I pulled from my Ubuntu 9.04 distro:

If you download the rename utility from here, you’ll probably need to run ‘chmod a+x’ to give execute permissions to the file after copying it to the appropriate place but otherwise things should be the same as above.

Examples

Wondering how it works?  Say you’d like to rename a bunch of .wav files and prepend the phrase ‘iheartrobots’ to the front of each filename (practical, I know).  Well you’d type the following:

rename -v 's/^/iheartrobots/' *.wav

The ‘-v’ parameter prints the names of the files that are being renamed.  Helpful and I use it most of the time.

Or how about replacing all instances of the word ‘cat’ with the word ‘dog’ in the filename of all .rtf files in a folder? Bam.

rename -v 's/cat/dog/i' *.wav

The ‘i’ at the end of the regular expression makes the search case-insensitive.

Finally, say you had a bunch of files that looked like this: Waltzing.With.Famous.People.S01E09.HDTV.XviD-SYS.[bztv].avi

And you wanted to get rid of everything between S01E09 and .avi, you could use the following:

rename -v 's/HDTV.*avi/avi/i' *.avi

The Homebrew Alternative

Now, thanks to Homebrew, you can skip all this nonsense and just do:

brew install rename

If you’re not using Homebrew, you should be.

More Information

If you’d like to get more information on the rename utility described here, the most obvious place is the man page (man rename) or online here.

Additionally, since it’s a Perl utility, more information on the Perl regular expression pattern-matching language can be found straight from the horse’s mouth.  Regular expressions are a madness unto themselves, but once you get the hang of it, most powerful stuff.

Categories
Software

The SoX of Silence

SoX is, by their own definition, the Swiss Army knife of audio manipulation.

And no doubt it’s full of fun with slicing and dicing and playback and recording and filtering and effects capabilities.

But SoX is a command line tool, which means obscure syntax and parameters in order to get things done.

I’ve been trying off and on for months to try to understand the silence filter from within SoX, which allows one to remove silence from the beginning, middle, or end of the audio. Sounds, simple, doesn’t it?  Well, it should be.

Below is the man page for the silence filter:

silence [-l] above-periods [duration threshold[d|%] [below-periods duration threshold[d|%]]

Removes silence from the beginning, middle, or end of the audio. Silence is anything below a specified threshold.

The above-periods value is used to indicate if audio should be trimmed at the beginning of the audio. A value of zero indicates no silence should be trimmed from the beginning. When specifying an non-zero above-periods, it trims audio up until it finds non-silence. Normally, when trimming silence from beginning of audio the above-periods will be 1 but it can be increased to higher values to trim all audio up to a specific count of non-silence periods. For example, if you had an audio file with two songs that each contained 2 seconds of silence before the song, you could specify an above-period of 2 to strip out both silence periods and the first song.

When above-periods is non-zero, you must also specify a duration and threshold. Duration indications the amount of time that non-silence must be detected before it stops trimming audio. By increasing the duration, burst of noise can be treated as silence and trimmed off.

Threshold is used to indicate what sample value you should treat as silence. For digital audio, a value of 0 may be fine but for audio recorded from analog, you may wish to increase the value to account for background noise.

When optionally trimming silence from the end of the audio, you specify a below-periods count. In this case, below-period means to remove all audio after silence is detected. Normally, this will be a value 1 of but it can be increased to skip over periods of silence that are wanted. For example, if you have a song with 2 seconds of silence in the middle and 2 second at the end, you could set below-period to a value of 2 to skip over the silence in the middle of the audio.

For below-periods, duration specifies a period of silence that must exist before audio is not copied any more. By specifying a higher duration, silence that is wanted can be left in the audio. For example, if you have a song with an expected 1 second of silence in the middle and 2 seconds of silence at the end, a duration of 2 seconds could be used to skip over the middle silence.

Unfortunately, you must know the length of the silence at the end of your audio file to trim off silence reliably. A work around is to use the silence effect in combination with the reverse effect. By first reversing the audio, you can use the above-periods to reliably trim all audio from what looks like the front of the file. Then reverse the file again to get back to normal.

To remove silence from the middle of a file, specify a below-periods that is negative. This value is then treated as a positive value and is also used to indicate the effect should restart processing as specified by the above-periods, making it suitable for removing periods of silence in the middle of the audio.

The option -l indicates that below-periods duration length of audio should be left intact at the beginning of each period of silence. For example, if you want to remove long pauses between words but do not want to remove the pauses completely.

The period counts are in units of samples. Duration counts may be in the format of hh:mm:ss.frac, or the exact count of samples. Threshold numbers may be suffixed with d to indicate the value is in decibels, or % to indicate a percentage of maximum value of the sample value (0% specifies pure digital silence).

The following example shows how this effect can be used to start a recording that does not contain the delay at the start which usually occurs between `pressing the record button’ and the start of the performance:

rec parameters filename other-effects silence 1 5 2%

Huh?

So lets try to clarify some of the mess from the man page.  First a couple of important notes:

  • When specifying duration, use a trailing zero for whole numbers of seconds (ie, 1.0 instead of 1 to specify 1 second). If you don’t, SoX assumes you’re specifying a number of samples.  Who on earth would want to specify samples instead seconds? You got me. Alternatively, you can specify durations of time in the format hh:mm:ss.frac.
  • Use at 0.1% at a minimum for an audio threshold. Even though 0% is supposed to be pure digital silence, with my test file I couldn’t get silence to trim unless I used a threshold larger than 0%. If you’d like, you can specify the threshold in decibels using d (such as -96d or -55d).
  • The realistic values for the above-period parameter are 0 and 1 and values for the below-period parameter are pretty much just -1 and 1. The documentation states that values larger than 1 can be used, but it only really makes sense for files with consistent audio breaks. Just trust me, it’s weird. I’ll get into what those values actually mean in the examples.

Now onto some examples! I’ll be showing you visually what happens to a sound file when we apply the various parameters to the silence filter.

I generated a test sound file with 60 seconds of white noise and then silenced various parts of the clip, leaving me with an audio file that looks like this:

SoX Silence Example (Original File)

Example 1: Trimming silence at the beginning

sox in.wav out1.wav silence 1 0.1 1%

The above-period parameter is first after the silence parameter, and for the sake of this article, it should be set to 1 if you want to use the filter. This example roughly translates to: trim silence (anything less than 1% volume) until we encounter sound lasting more than 0.1 seconds in duration. The output of this command produces the following:

sox in.wav out1.wav silence 1 0.1 1%

We’ve lopped off the silence at the beginning of the clip. For simplicity’s sake, we’ll refer to the 1% threshold as silence from now on.

Example 2: Ignoring noise bursts

sox in.wav out2.wav silence 1 0.3 1%

By changing the duration parameter to 0.3, we tell SoX to ignore the burst of noise at the beginning of the example clip. This produces the following:

sox in.wav out2.wav silence 1 0.3 1%

We can ignore short pops and clicks in audio by adjusting this duration parameter.

Example 3: Stopping recording when no sound detected

sox in.wav out3.wav silence 1 0.3 1% 1 0.3 1%

Now we introduce the below-period parameter it’s respective sub-parameters.  Just like the above-period parameter, just set it to 1 and call it good.  The command above translates to: trim silence until we detect at least 0.3 seconds of noise, and then trim everything after we detect at least 0.3 seconds of silence.

sox in.wav out3.wav silence 1 0.3 1% 1 0.3 1%

This returns a file with just the first 4 seconds of noise (note that we ignore that 0.25 sec burst of noise at the beginning). Where’s the rest of the clip?  Well, it’s gone. Not super practical for post-production of audio, but can be useful when recording live audio, so that SoX stops when it doesn’t encounter sound for a certain number of seconds.

So an aside: if you’re looking to trim silence from the beginning and the end of a audio file, you’ll need to utilize the reverse filter and a temp file like so:

sox in.wav temp.wav silence 1 0.1 1% reverse
sox temp.wav out.wav silence 1 0.1 1% reverse

Don’t forget to delete that temp.wav file when you’re done.

Jakob points out in the comments that you can trim silence from both ends in one fell swoop by chaining the effects like so:

sox in.wav out.wav silence 1 0.1 1% reverse silence 1 0.1 1% reverse

Example 4: Trimming all silence

sox in.wav out4.wav silence 1 0.1 1% -1 0.1 1%

By changing the below-period parameter to -1, we can trim instances of silence in the middle of the clip, by allowing the filter to restart after it detects noise of the specified duration.

sox in.wav out4.wav silence 1 0.1 1% -1 0.1 1%

In my example clip, it’s impossible to detect where the silence used to be, but with an actual podcast or other audio, it should be easier to tell.

Example 5: Ignoring short periods of silence

sox in.wav out5.wav silence 1 0.1 1% -1 0.5 1%

In similar fashion as Example 2, we can instruct SoX to ignore small moments of silence (1/2 second in this example).

sox in.wav out5.wav silence 1 0.1 1% -1 0.5 1%

When trimming silence from podcasts and the like, this prevents you from removing moments when someone stops to take a breath and making the conversation sound too rushed.

Example 6: Shortening long periods of silence

sox in.wav out6.wav silence -l 1 0.1 1% -1 2.0 1%

So what if you wanted to just shorten long moments of silence rather than remove them entirely?  Well, you need to add the -l parameter, but it needs to be placed first, before the other parameters for the filter effect. The example above results in trimming all silence longer than 2 seconds down to only 2 seconds long.

sox in.wav out6.wav silence -l 1 0.1 1% -1 2.0 1%

Note that SoX does nothing to bits of silence shorter than 2 seconds.

Example 7: Shortening long periods of silence and ignoring noise bursts

sox in.wav out7.wav silence -l 1 0.3 1% -1 2.0 1%

Finally, let’s tie it all together by trimming silence longer than 2 seconds down to 2 seconds long, but ignore noise such as pops and clicks amidst the moments of silence.

sox in.wav out7.wav silence -l 1 0.3 1% -1 2.0 1%

As a result you’ll see that we’ve cropped out the 0.25 seconds of noise at the beginning of the clip, but left the 0.5 seconds of noise in the middle.

For actual usage, you’ll probably want to specify something shorter than 0.3 seconds for the duration if you’re just trying to filter out pops and clicks.

Bonus Example 8: Splitting audio based on silence

sox in.wav out.wav silence 1 0.5 1% 1 5.0 1% : newfile : restart

Using SoX’s newfile pseudo-effect allows us to split an audio file based on periods of silence, and then calling restart starts the effects chain over from the beginning. In this example, SoX will split audio when it detects 5 or more seconds of silence. You’ll end up with output files named out001.wav, out002.wav, and so on.

Final Thoughts

There you have it.  This is what I know about the silence filter effect in SoX.  Example 7–where we trim some but not all of the silence and ignore pops and clicks–is ultimately what I was trying to figure out when writing this article, but I figure the other examples have got to be a good reference for somebody me.

The above and below-period values are still mostly a mystery to me.  I may address them in another post, but for now, I’m just going to use this as a cheat sheet in case I forget.

And don’t forget to use the trailing zero when specifying whole seconds. Even while writing this I forgot multiple times.

I welcome thoughts, ideas, comments, and corrections. Please.

(edit 11/14/10 to add names to each of the examples for clarification)
(edit 04/28/11 to add audio splitting example)
(edit 12/06/12 to add one line silence trimming) 
    • sox in.wav out.wav silence 1 0.8 1% 1 1.0 1% : newfile : restart